Airbrush skin like a pro. In this Photoshop retouching tutorial, you'll learn how to retouch skin like the professionals. Find out how to make skin look healthy without looking plastic or blurred.
Sample PSD (Photoshop Document)
Airbrushing Skin Photoshop Tutorial
Step 1
Open the photo into Photoshop. For this tutorial, try to use a high resolution image where you can see the skin texture.

Step 2
Create a duplicate layer and put it into a group. To do this, press Ctrl+J to duplicate the layer then Ctrl+G to place the new layer into a group. Name the group "Airbrush" and the layer "Blur". To retouch the skin, there will be two layers in the Airbrush group. The first layer we've created (the Blur layer) will be used to blur the skin. After that, we'll add another layer to restore the natural skin texture.

Step 3
Have the Blur layer selected. To blur this layer, use the Surface Blur filter. This filter blurs like the Gaussian Blur filter except it can retain edge detail. We'll need to blur the layer so that the skin is smoothed and somewhat blurry without having the edges

Here's what my image looks looks like after the Surface Blur filter. Your image should look similar with details such as the eye intact. If the eye becomes blurry, your settings are too strong. Undo and redo the Surface Blur filter with a lower setting.

Step 4
Create a new layer and move it above the Blur layer. Name this layer "Texture" and change the blend mode to Hard Light. This layer, as the name states, will be used to add a slight texture to the skin and also adjust the skin tonality.

The texture created in this layer will contribute to the final results very minimally - the difference can only be easily seen zoomed in on high resolution images and varies from image to image. Even though the result is very minimal, it ensures that no area of the skin looks too smooth or plastic.
Below is an example of this. On the left, the image looks like a solid color, also known as plastic skin. The image on the right has a slight noise pattern to make the skin look more realistic.

Step 5
Make sure that you have the "Texture" layer selected. With that layer selected, press Shift+F5 or choose Edit > Fill. In the Fill tool, set the settings according to the image below. This will fill your layer with a 50% gray color.

Step 6
Open the Add Noise filter from the Filter > Noise menu. Enter in the settings shown in the image below. This will add some noise to the image that will prevent skin from looking plastic. It may look a little too sharp, but in the next step, we'll fix this with a Gaussian Blur filter.

Step 7
Choose Filter > Blur > Gaussian Blur. Blur the layer by 1 pixel.

Step 8
Now we'll temporarily tint the color of this layer. First, select the Eye Dropper tool from the toolbar. Sample an area on the skin that appears to be the average skin color. You don't have to be very precise because we will tune the color later in the tutorial. In the Color palette, click on the flyout menu below the close window button and select HSB sliders. We'll need to see the HSB values for the next step.

Step 9
Open the Hue/Saturation tool by pressing Ctrl+U or choosing Image > Adjustments > Hue/Saturation. Check the Colorize option and adjust the hue, saturation, and lightness values to match the HSB values from the color we sampled in the previous step. For the brightness, set this to

Step 10
Select the Airbrush group in the Layers palette and add go to Layer > Layer Mask > Hide All. This will create a layer mask filled with the color black that will hide the group. With this layer mask, we'll paint the areas were we want the skin to appear. Otherwise, this skin airbrushing effect will appear on the entire image.

Step 11
First, press D on your keyboard to set the foreground and background colors to the default black and white. Select the Brush tool and apply the settings below.

Zoom in to 100% and paint over the skin. The parts that you paint will appear smoother with a different skin tone. Don't worry if the skin tone doesn't look correct. This is because we didn't pick the correct color when we used the Hue/Saturation to tint the "Texture" layer. It's too difficult to do that without a preview, so we'll fix that later.
When painting, you'll need to change the brush size and hardness frequently. It would be tedious to always access the brush option menu to do this so take this as an opportunity to use hot keys. Use the following hot keys to help you with modifying the brush size and hardness:
- Decrease brush size: [
- Increase brush size: ]
- Decrease brush softness by 25%: Shift + [
- Increase brush softness by 25%: Shift + ]

When you're done, your layer mask should have the skin areas in white and the skin should look smooth.

Step 12
Now we're going to fix back the color and tone of the skin as we mentioned earlier in the tutorial. Select the "Texture" layer and press Ctrl+U to access the Hue/Saturation tool. Alter the settings to get a natural looking skin tone.
- The Hue setting is usually correct. I increased it by 10 to add more yellow to it to make the appearance of the red areas less visible.
- The Saturation setting usually needs to be reduced greatly. Adjust this until the skin tone looks natural but not too pale.
- The Lightness setting requires slight modification. A slight change in the lightness will create big difference in how the skin blends in with the image. As you adjust the setting, you will see how sensitive this setting is. Even though it requires high precision, it is easy to tell when it is the correct setting. If it is off, it will look really off. If it is at the correct setting, it will look a lot more natural.

Step 13
Finally, we're going to restore the skin details. Choose Image > Apply Image. Use the settings below.

The reason why we're applying data from the Red channel is because it contains the least skin imperfections. The image below shows the difference in the channels. The red channel hides many of the skin imperfections that are visible in the green and blue channel.

Final Results
Here's the final results after applying this airbrushing technique. In the image below, you can see how smooth the skin looks. Because the image below has been downsized to fit into this tutorial, it may look slightly plastic. However, when zoomed in, the texture is clearly visible.

This is a crop of an area zoomed in 100%. The tiny skin bumps are still visible. Even near the bottom right of the image, it still looks natural because of the "Texture" layer that we added. Without that layer, that area would appear as a solid color with no noise.

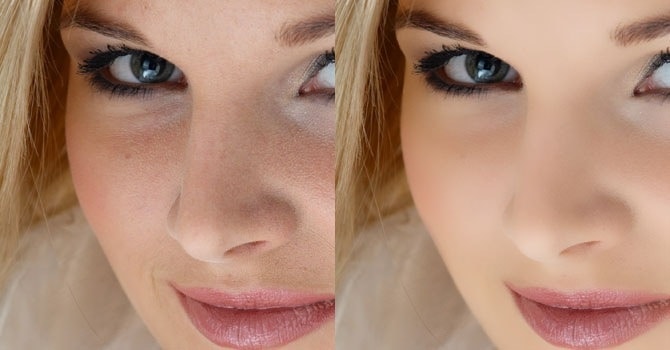
And as usual, here are the before and after images.


Update: Here's a video on retouching skin in Photoshop. It's a completely different tutorial than this one but I highly recommend you watch it.
Skin Retouching Photoshop Actions
Update 2: I highly recommend you try these skin retouching actions - they're the best actions you can get. To use, simply play the action then paint over the skin. You can airbrush skin, mattify skin, restore blown-highlights, and more. Highly recommended. The Pro version includes additional actions.
Update 3: If you're looking for something basic, download these Frequency Separation Photoshop actions. They're made a similar frequency separation technique shown in this tutorial and can autoretouch your photo using Photoshop's face detection technology. The Pro version works with 16 and 32-bit photos and lets you apply both modern and traditional frequency separation. Don't know what modern/traditional frequency separation is? Read below.
What is Modern vs Traditional Frequency Separation?
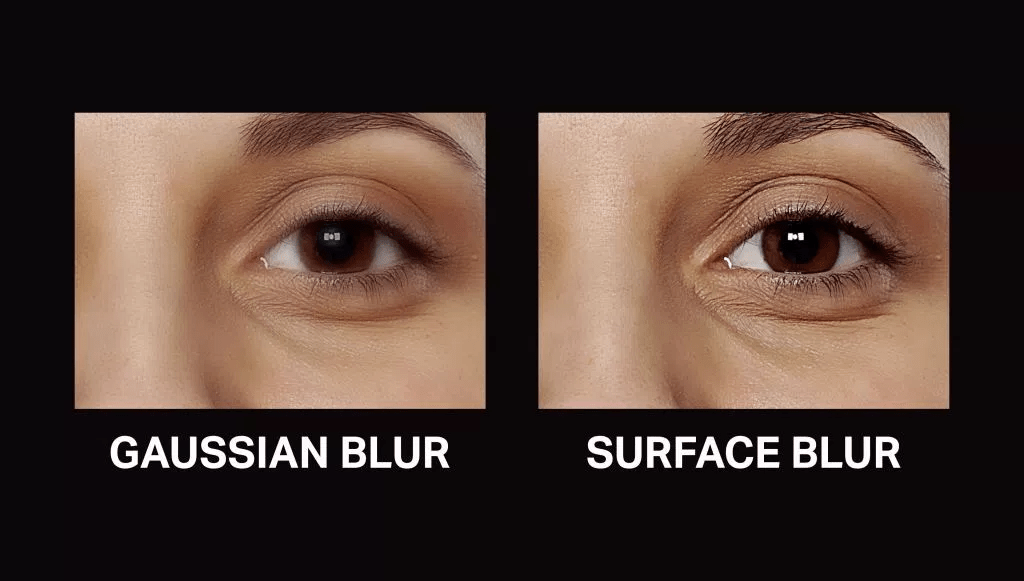
One of the techniques that you learned in this tutorial is Modern Frequency Separation. This is done using Photoshop's Surface Blur filter which gives more natural results. With Traditional Frequency Separation, the Gaussian Blur filter is used instead of Surface Blur. This gives a softer and more diffused look. It's also less natural-looking so I recommend using it with caution especially on portraits with wrinkly skin.
See this image from Denny's Tips as an example:
Great Technique!!
I usually use Portraiture Filter, it made smooth skin but sometime look like plastic Thanks for sharing.
looove this
tx soo much
i love this tutorial very easy and straight forward
XOXO
i would like to see the girl before she was photoshoped like a full body pic of her
I liked this technique. I needed to erase some of the blur effect (i.e. eyebrows, lips and nose, etc.) Otherwise it worked just fine. I guess my question is, should the Blur be done with a layer mask?
If more layers are required should they go above these or below?
Hey i don't get step 3 how u have 1. and 2. for surface blur.
Help me out?
Thank you so much, this tutorial was fantastic. I am glad there are people like you on the web that take the time to help others.
I liked this tutorial, i tried, and it went out pretty well,
What i liked about this tutorial was the effects and its pretty short.
I have a question when i apply the texture layer and do the fill step my image goes completely gray and not the grainy gray that it does in the tutorial, i changed the opacity to 20 so that it didn't cover it but i think this didnt work too well because my skin didnt really have texture to it
thanx in advance
I have a question when i apply the texture layer and do the fill step my image goes completely gray and not the grainy gray that it does in the tutorial, i changed the opacity to 20 so that it didn't cover it but i think this didnt work too well because my skin didnt really have texture to it, and the red channel step didnt work out too well.
thanx in advance
great tutorial on airbrushing! Gives more realistic results than other techniques. you may be right hayley about hard light-soft light change, exact steps worked for me for now but i will try with soft light option too. Thanks a lot.
Hey step 11 isn't working for me as well nothing happens when I try to paint the skin with my brush tool. The mask layer is selected in the folder.
what a great technique.
it's actually simpler than i thought.
thx for sharing.
That's quite a few steps to "airbrush" a face. Nice end result though.
i really dont understand how to make a layer i am gettin so confused please help!!
love it....i also found that if you change the opacity of the whole layer the effect looks alot better.
cheers
I really like this technique. If you don't like the end result, the play around with it till you get what you like. I feel it's a good start, good basics.
Thanks
Hiya, I'm trying to do the tutorial right now, and I'm at the airbrshing stage, as in ive just created the black mask- and i'm trying to airbrush around the lips like your doing the photo, but the new skin tone won't show through! the image just looks the same 🙁 what am I doing wrong? i triple checked all the steps and I'm pretty sure I havent missed one! please reply, i really like this tutorial and i really want to finish the photograph!
Awesome tutorial! thanks heaps 🙂
Excellent tutorial, It really details all the tools and techniques are required..spot on 🙂
Even though the tutorial result is a teeny tiny bit on the plastic side (as you mentioned it probably would be), the fact is that the methods you have taught here can be tuned to the n'th degree to obtain whatever result one requires. This has gone straight in to the most used favourites page 🙂
Thanks!
thank you for the tutorial very useful and professional!!
horribal... my picture looks terribal!... bad tutorial
OMG you are the best. I am wanting to get into fashion photography and with this tutorial I'm on my way. Many many thanks
please keep me in mind if you have other tutorial. Like they say "Our Future is an empyt canvas just waiting for the first stroke" this has done it for me. Your the Best.
I go through tuts all the time. This one is really easy and helpful. Thank you very much!
FANTASTIC!!!!!
Very good Tutorial !! i've tried many and many of them, this one is what i like most so far !!
Thanks for your time
Mine looked too orange. I suppose Asian skin is a lot different. Im gonna try it again! At least my skin looks ultra smooth! lol...
In Step 9, What level do you recommend for the "Brightness" ?
Thanks for the tutorial,
Steve
Thank you for taking the hours of time to post this tutorial. As far as the negative comments go: why criticize someone for doing something nice? This give me a clue as to what to do, a base that can be built on.
Thank you,
Todd
Nice Work, thanks buddy, I've done only in 3rd step
thank you so much for making this. as a beginner i found it incredibly helpful and agree with others that it covers the basics and you can fine tune to taste. once again thank you for making and posting this excellent tutorial
i really found this tutorial helpful as i wanted to learn this technique as a more proffesional way to smooth out skin. i found i didn't like the hard light option for my photo, but when applying soft light and reducing the lightness some more i got the result i wanted. people who don't like the results after following the tutorial exactly maybe just need to play around a little to suit their individual photo and styles. let me know of more tutorials like this please. 🙂
this is the best tutorial ever i think you should keep doing this you explain everything like a 3 year old kid which is awesome not everybody do that - i wish you could make a tutorial about cartuning (caricature) but real caricature not plug ings crap the real deal god bless you keep up the good work
Tried it on a sample image. I found it a bit too plastic so I adjusted the blur layer opacity down to about 49-50% which let in a little more of the natural skin texture. A nice compromise between reality and that magazine look.
Thanks!
usually i don't post while read, but this tutorial was really good, that was what i was looking for! tnx!
Thanks for the help...your the best. Happy Holidays
I loved my end results thanks....to keep a little bit of the real texture of the skin I advise not doing anything at 100 percent. If it is left at a 75 or less area for the air brush group I think it gives a more realistic look. Well written and done tutorial and works beautifully so thank you.
great tutorial! thanks so much.
Having trying this tutorial for quite few times now In my opinion after step 8 I definitely dont see any massive improvement and things get too confusing for a very plastic result. I think if you want a flawless skin efect you should airbrush spots, eyeshadows and then use this tutorial but I find better results when I follow it up to step 8 and just ajust brightness and contrast along with colour balance. the end result of this tutorial is a terrible plastic skin as if the picture was taken from Madame Tussauds
Great tut, love the natural looking skin, yet very clean look including the eyes, a very pretty girl to start a beauty at your talent.
Hi,
Can someone help: Step 11 is not working. When I use the brush nothing is happening...
Thanks very much!
wow this is sooo helpful! thanks so much!!!
very good! almost perfect - it's true, at the end it looks a bit to plastic but the thing with that sort of images is - you always have to work at finall resolution of image, and doing it for web display would be a different story (much easier btw), but this is very nice example of print job and that was what I was looking for long time
wonderful tutorial, exactly what i was looking for a fashion editorial called alivedoll. thanks
who is girl?
Hey, great tutorial.
What camera did you use if you youself took the picture?
Thanks. =]
thnx tonz!
ive been looking 4 lessons lyk these
n dis 1 is d best so far!
all h8rz above
stop h8in!
effects were awsum!
love it
2 thumbs up!=)
Pretty nice job.
Except the last layer doesn't actually do anything. And I mean nothing. A layer has to be filled with something, anything, to make any kind of manipulation to it. otherwise its just a completely transparent "tarp" over the image that cannot interact in any way with it, or any other layers, in any way.
I like the idea though.
in the step 9, i don't see what the settings for brightness should be. any idea?
thanks.
its a great tutorial but am not quite getting it...i think am missing a step when airbrushing..but ill keep trying
If you just maintain the original background layer and keep it as the baseline topped by your finished one then fade back a fair bit (Opacity) this would tend to bring back more realistic look of the facial skin. Elsewhere use layer mask to conceal or reveal the parts.